|
How and Why to Implement IPortable in a Module
The DotNetNuke framework provides many different interfaces that module developers can implement to allow modules to provide common functionality. IActionable is used for adding items to the action menu; ISearchable is used to provide content to the search indexer system. These two interfaces are pretty well known by developers as they are much needed items to create functional modules. IPortable is one additional interface that many developers overlook, however, from an end users perspective it is a very needed piece of functionality allowing them to manage their content.
Why Implement IPortable?
Implementing IPortable is a simple process and involves adding two simple methods to your Business Controller class, so it is not something that will cost you a large amount of time to implement. However, the user benefits in most cases are great. If a module implements IPortable uses with edit permissions will see the following two actions in the action menu for your module.
These options give your users the ability to import/export content using a familiar interface. This might help someone that tests your module on a different environment than their production environment and wants to move the content from one server to the other. It also helps when users create Site Templates, if a module supports IPortable they can include the content as well as the actual module instance.
How Does it Work (User Experience)?
The user experience when working with modules that implement IPortable is very easy. To export content the user simply selects “Export Content” from the action menu, they are presented with the following page.
The user simply specifies the file name they wish to create, without an extension and they click “Export”. After clicking export they are redirected to the module page. If we look at the File Manager for the site you will see the newly created file, circled in red below.
This is important to note as DotNetNuke adds the content.. To the beginning of the users desired file name. This portion must NOT be removed as if it is, the user will NOT be able to import the content into the module.
Importing works in a very similar fashion the user is presented with a control allowing them to select the input file, once selected they can click “Import” and the records will be applied to the module.
Now that you know how it works from a user perspective, lets dig into the code.
How to Implement in Code?
You implement IPortable inside your modules BusinessControllerClass after modifying your controller class to implement the IPortable interface which is part of the DotNetNuke.Entities.Modules namespace you will need to implement the following two methods.
Export Module
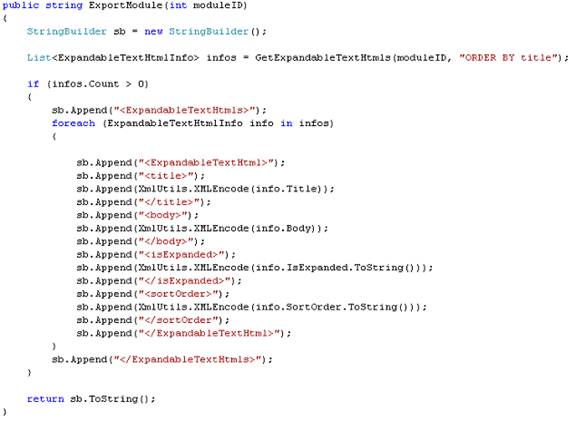
We will start looking at the export module function first. DotNetNuke provides you on piece of information, the moduleId, and expects you to return a string value. The string value that you return must be a valid piece of XML as it is injected into the final XML document created by DotNetNuke that includes additional information. Typically a very simple process can be used to get all data elements from your module and loop through them formatting them in XML. Below is an example implementation of ExportModule from the Expandable Text/HTML module provided by Mitchel Sellers
 |
This is very simple code, obtaining a listing of all info objects for the current module, and a simple for each loop to write it in XML format using a string builder. Other methods could be used to create the XML structure, however, since a string is the desired end result, the use of a string builder is the most common practice.
After providing this information back to DotNetNuke when it creates the actual content file it will add information regarding the current version of the module which can be used later to ensure that your import process matches to the correct XML structure.
Import Module
The import module method is provided four pieces of input data; moduleid, content, version, and userid. You will use these methods to successfully import the content. The passed module id is the id of the module to which content should be inserted. Below is the ImportModule method from the Expandable Text/HTML module.
This code is another fairly simple piece, at the base of it you use .NET XML methods to work with the XML content to build your own information objects and insert the records using your standard controller class methods. The important item to note here is actually the first few lines of code. A version check is done to determine if the export is supposed to have a specific field. Using a technique similar to this you can handle imports from different versions of the module without incident if you add/remove items from the import process.
Conclusion
Following the above simple steps you should be able to implement the IPortable interface without issue. This is a very powerful addition to a module’s functionality that can be of great benefit to the users of the module.
|