This demonstration highlights the following:
- The new Save for Later feature.
- The Month-Day-Year drop down list option for the Date field type.
- The new Hidden Fields Control Panel for Admins.
- The Quick Stats option available to Admins.
We'll also discuss the ability to send emails to Security Roles (instead of individual emails) and the new AJAX controls for increased responsiveness with question events.
Let's begin with the user's ability to Save for Later.
To use the Save for Later feature, go to Module Configuration and expand the Links Section. Go to the Save for Later area where you can select the button you want to use for this purpose. Remember to check the "Enable Save for Later Button" setting.
A unique message can be displayed if the user chooses to save for later by going to Module Configuration, Layout and then to System Messages. From the dropdown list, please choose Display After Save Message (Save for Later). Enter any message you like and be sure to hit Update Message before hitting Update Settings at the bottom. Notice that in our example here, the message says, "Thank you for saving your form. Please watch for an email where a link is provided so you can complete the form later." An entirely different message can be set for when the user submits the form.
The Continue button that will appear below your message will follow any redirection settings you have in Module Configuration, General Settings or in Completion Events.
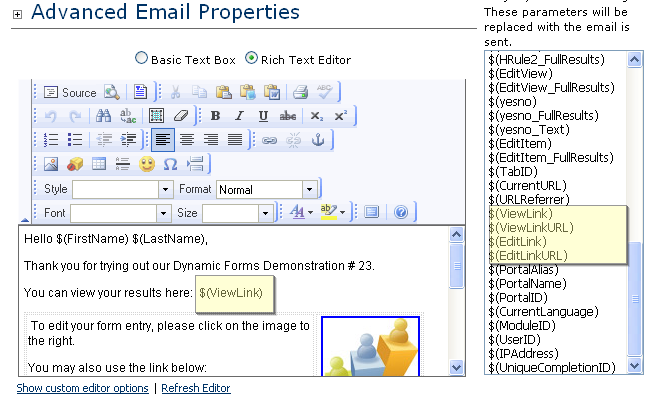
In this example, the user can only access the saved form through a link provided in an email. Create an email event that is set to fire for 'Save For Later Only' and include the $(EditLink) token in the email body.

If you choose $(ViewLink) or $(EditLink), the words 'Review Results' and 'Edit Form Results' will show on your email, respectively. To imbed a link to your own text or image, use $(ViewLinkURL) or $(EditLinkURL).
You may also choose to create another email event to fire for Save Only (when the user submits).
Now, lets discuss the new Month-Day-Year format for the Date field.
This offers the ability to define the years to be included in your drop down list.

Please note that the 'Ending Years' setting always counts from the current year. Therefore, the above settings will give you a range of 2009 to 2014. You may also offer past years by using a negative number in the Starting Years. For example, if you want the earliest year to be 1988, you need to set it to -21.
Remember: The starting year value is the number of years going back from today. The ending year value is the number of years going forward. A value of zero denotes current year.
The new Hidden Fields Control Panel
This great new feature for Admins will display any hidden fields at the bottom of the form. This eliminates the need to go into 'Manage Questions' and individually searching for the hidden fields by name. Please note that this applies to fields with the field type of Hidden (not fields that are hidden by role or are set to 'hide until forced visible by question events.'

The new Quick Stats

Again, making life a little easier for the Admins, this feature offers quick info regarding the field. Here, you can easily see the field type, the short field name and other specific settings like 'hide until forced visible by question event.' just like in the example above. If it applies, it will also show if the field is required, etc. For flexibility, you have the option to disable this feature under Module Configuration, General Settings.
Lastly, let's talk about AJAX and Question Events.
Question events in previous versions required a postback which causes a long delay in execution. Now, you'll notice that the question events no longer needs a postback and executes much more quickly. The User Guide provides instructions on how to set up Question Events.
Did you notice the progress image? You can set up your own by going to Module Configuration, AJAX/jQuery Integration. Choose Link Type: File. If you click on Generate, you'll get to www.ajaxload.info where you can generate your own image. Once created, you can choose to Upload New File in Dynamic Forms with your new AJAX progress image. Otherwise, you can use the Alternate Modal Popup Message to add your own text as you can see in Demo 28.
Visit other Dynamic Forms Demonstrations to see how this module can enhance the look and functionality of your site!